
The search for smoother scrolling resulted in swapping LazyVGrid for NSTableView, documenting unofficial insights and reflections on AppKit coding.
Recently, I had one of those really productive months. It felt like I was finally getting close to finishing up my macOS side project. After three solid days of working on templates, I decided to switch gears and tackle this performance test ticket that had been sitting on my project board for like 10 months. I had been saving it as a little treat for myself.
I set up a big test with lots of invoices, each with different decorations and formatting, to see how my current setup with SwiftUI’s LazyVGrid would handle it (I needed LazyVGrid because the usual List just wasn’t up to the task with all the UI features I wanted). So I fired up my project with the test dataset and here’s what I saw:
Honestly, it was better than I expected. I thought it would be worse. While it looks like a simple list, there’s a lot going on with various modifiers for:
- Left click
- Right click
- Double click
- Hover
- Focusability
- Custom focusability for navigating with keys
- Commands for delete and enter
The user experience isn’t great, but it’s still probably okayish for a version 1.0.0 release. The performance issues are less noticeable with fewer items unless you’re used to high-quality apps. But then there was this one thing that bugged me: the behavior of the context menu.
On macOS, right-clicking an item usually selects it and shows the context menu. SwiftUI’s .contextMenu shows the menu but doesn’t select or give you any callback for selecting the item. This can be confusing because you don’t know if you’re seeing the menu for the right item.
My first attempt to fix this was using native SwiftUI stuff, but it wasn’t quite right. It felt laggy. So, I ended up creating a custom modifier that bridges to rightMouseDown(with:) on NSView.
What was the result?
You can see there’s a delay on the first click. And even though it gets better during the next selection, there is still an issue as the context menu jumps around. This happens because I’m manually updating the selected item which results in a re-evaluation of the context menu.
Another paper cut. It’s not a huge deal, but for me, it felt off. Each time I right-clicked, I felt like a con artist pretending to write good software while in reality not caring about the small details. While I might sound overdramatic (for some reason, I like to do that when writing), I honestly started avoiding right-clicking items in order not to bring bad vibes to my awesome day.
So, I had two choices:
- Leave it be and hope for an update at the next WWDC
- Revisit good old AppKit and see if it could help
While WWDC is getting pretty close, the fact is that I want to target older macOS versions, so I don’t really see this resolving with the magic of WWDC.
Since I assume that reading about AppKit is not as exciting these days, I’ll spare you a bunch of scrolling and show you the result of the rewrite here:
Damn, did it feel buttery. One detail to note is that I removed the hover effect, but I can assure you it wasn’t for performance reasons. It was actually because, after trying various (what I feel) good macOS apps to assess their scroll performance, I realized that hover isn’t really common. Playing around with and without the hover effect, I actually preferred the minimalistic approach.
But the main reason for this overhaul wasn’t just the scroll performance. It was also fixing that annoying context menu issue. And how’s that now?
Well, it felt like it should. It’s not revolutionary, but it feels damn great. On top of all this, I managed to get rid of some extra code for keyboard navigation, clean up the layout mess, and now I can easily adjust and rearrange columns.
The remaining part of this post will go over some challenges and gotchas of replacing LazyVGrid with NSTableView while still reusing SwiftUI views.
Hello AppKit

Quick heads up: I’m not the guru of AppKit, so just take my experiences for what they are. I wanted to share some insights, especially about things like NSTableHeaderCell, which I didn’t really find mentioned elsewhere.
Bridge
This is a relatively simple and common step. You create an NSViewRepresentable that will act as a bridge between your SwiftUI and AppKit worlds. The only gotcha here is don’t forget to embed your NSTableView into an NSScrollView.
If you are like me and the header of your NSTableView is driven by SwiftUI, then updateNSView(_:context:) will be your friend. Every time something relevant changes in your SwiftUI data model, this will be triggered and serve as an opportunity to update your views. In my case, I used this to:
- Reload initial data
- Pass updated SwiftUI view definitions
- Send updated dynamic data (e.g., date formatting preferences) to the coordinator.
Cell
I’m not a macOS historian, but I noticed that most of the documentation, questions/answers, and tutorials assume that you are managing the UI in non-programmatic ways. My guess is that it has to do with Cocoa bindings and the overall Cocoa architecture.
With all that in mind, if you are like me and want to still go the code-driven UI way, makeView(withIdentifier:owner:) will be your friend. However, a big gotcha if you want to benefit from cell reuse is you must manually set the identifier like so:
var cell = tableView.makeView(
    withIdentifier: .invoiceListCell,
    owner: nil
) as? InvoiceListTableCellView

if cell == nil {
    cell = InvoiceListTableCellView()
    cell?.identifier = .invoiceListCell
}
This is not obvious because, in many tutorials, answers, and so on, these identifiers are set in Interface Builder, so when you look at the code, you won’t see them manually setting the identifier.
Host
Embedding a SwiftUI view into the NSTableCellView is also pretty straightforward. You just need to create your custom host cell, and in its setup, either create a new host view or update an already existing one.
final class InvoiceListTableCellView: NSTableCellView {
    private var hostingView: NSHostingView<AnyView>?

    func setup<V: View>(@ViewBuilder using viewBuilder: () -> V) {
        let rootView = viewBuilder().eraseAnyView()

        if hostingView == nil {
            let newHostingView = NSHostingView(rootView: rootView)
            newHostingView.translatesAutoresizingMaskIntoConstraints = false
            addSubview(newHostingView)
            NSLayoutConstraint.activate([
                newHostingView.widthAnchor.constraint(equalTo: widthAnchor),
                newHostingView.heightAnchor.constraint(equalTo: heightAnchor),
            ])

            hostingView = newHostingView
            return
        }

        hostingView?.rootView = rootView
    }
}
Header
This is where things start to get tricky, especially if, like me, you have a custom SwiftUI header that needs to update when some external data changes. If you also want to properly support drag-and-drop and resizing, this turns into a real puzzle.
The process begins simply by creating a custom NSTableHeaderView that performs the same update routine we’ve seen before:
final class InvoiceListTableViewHeaderView: NSTableHeaderView {
    private var hostingView: NSHostingView<InvoiceListTableViewHeader>?

    func update(using header: InvoiceListTableViewHeader) {
        if hostingView == nil {
            let newHostingView = NSHostingView(rootView: header)
            newHostingView.translatesAutoresizingMaskIntoConstraints = false
            newHostingView.frame = NSRect(x: 0, y: 0, width: 0, height: headerHeight)

            addSubview(newHostingView)

            NSLayoutConstraint.activate([
                newHostingView.topAnchor.constraint(equalTo: topAnchor),
                newHostingView.widthAnchor.constraint(equalTo: widthAnchor),
            ])

            hostingView = newHostingView

            return
        }

        hostingView?.rootView = header
    }
}
While this looks relatively straightforward, to meet all the initial requirements, the custom NSTableHeaderView will eventually need to handle much more.
To start using this header, we write a convenience function that either creates and assigns it to NSTableView.headerView or updates the existing one:
func updateHeader(for tableView: NSTableView?) {
    if let header = tableView?.headerView as? InvoiceListTableViewHeaderView {
        header.update(using: tableHeader)
    } else {
        let header = InvoiceListTableViewHeaderView(
            sortingBehaviour: sortingBehaviour
        )
        header.update(using: tableHeader)
        tableView?.headerView = header
    }
}
And now we enter the true horror land. Since we want to use our SwiftUI views for the column headers, we create a custom NSTableHeaderCell like this:
final class InvoiceListTableViewHeaderCell: NSTableHeaderCell {
    let column: InvoicesListViewColumn

    init(column: InvoicesListViewColumn) {
        self.column = column
        super.init(textCell: String(localized: column.title))
    }

    override func draw(
        withFrame cellFrame: NSRect,
        in controlView: NSView
    ) {
        guard
            stringValue != "",
            let header = controlView as? InvoiceListTableViewHeaderView
        else {
            return
        }

        let newFrame = NSRect(
            x: cellFrame.origin.x,
            y: headerHeight,
            width: cellFrame.width,
            height: headerCellHeight
        )

        if let existingView = header.lookup[column] {
            existingView.rootView = makeView(
                column: column,
                header: header,
                frame: newFrame
            )
            existingView.frame = newFrame
        } else {
            let hostingView = NSHostingView(
                rootView: makeView(
                    column: column,
                    header: header,
                    frame: newFrame
                )
            )
            header.lookup[column] = hostingView
            header.addSubview(hostingView)
            hostingView.frame = newFrame
        }
    }

    // We don’t want the default UI
    override func drawInterior(
        withFrame cellFrame: NSRect,
        in controlView: NSView
    ) {}
}
There’s a lot to unpack here, but here are crucial points to note. Some of these aspects, AFAIK are undocumented and took me quite a bit of time to figure out.
The first important line is init(textCell:). While we have no intention of using the default UI drawn by AppKit, we need to call the super initializer. However, when we do so, we must set something sensible as the string name as this is what we use in draw(withFrame:in:) when we check for a non-empty string value. If we don’t do this, we will see something like this:
As you can see, the last column header leaves its place and starts following the currently dragged column. However, if you inspect the calls to draw(withFrame:in:), you will notice that in these cases, something fishy is going on because stringValue is empty.
If you use the default implementation, you will see that the drawing is correct even though draw(withFrame:in:) receives these invalid frames. I didn’t spend much time investigating, but I have a feeling that it relates to the next surprise.
If you have a keen eye, you might be questioning why I am using NSTableHeaderView as storage for the lookup. That seems somewhat hacky, right? Well, the reason for that is if you store this data in NSTableHeaderCell, you will receive beautiful crashes when you start re-arranging the columns.
Initially, I thought it was related to SwiftUI as the crash was pointing to the SwiftUI internal storage. However, after getting crashes with other properties and discovering rdar://26349281, I believe that the issue is not related to SwiftUI.
To overcome this crash, we store relevant data in NSTableHeaderView as it’s not getting deallocated during drag and drop. This brings us to the next issue where the column header stays in the wrong position during rearrangement:
I couldn’t find any method to hook into active column dragging, so again, I had to resort to NSTableHeaderView by overriding its drawing code:
override func draw(_ dirtyRect: NSRect) {
    super.draw(dirtyRect)

    guard
        draggedColumn != -1,
        let tableView = tableView
    else {
        return
    }

    let headerRect = headerRect(ofColumn: draggedColumn)
    let column = tableView.tableColumns[draggedColumn]
    let newPosition = headerRect.offsetBy(dx: draggedDistance, dy: 0)

    guard
           let cell = column.headerCell as? InvoiceListTableViewHeaderCell,
           newPosition.origin.x > 0
        && newPosition.origin.x + newPosition.size.width < bounds.size.width
    else {
        return
    }

    lookup[cell.column]?.frame.origin.x = newPosition.origin.x
}
This nearly resolves all the issues, but if your header is tall, you might need to limit drag actions to a specific area to prevent users from rearranging and resizing columns from anywhere in the header, which can be entertaining yet impractical:
To achieve this, we once again go to our NSTableHeaderView and add the following overrides:
override func mouseDown(with event: NSEvent) {
    let point = convert(event.locationInWindow, from: nil)
    guard point.y > headerHeight else {
        return
    }

    super.mouseDown(with: event)
}

override func cursorUpdate(with event: NSEvent) {
    let point = convert(event.locationInWindow, from: nil)
    guard point.y > headerHeight else {
        return NSCursor.arrow.set()
    }

    super.cursorUpdate(with: event)
}
In cursorUpdate(with:), we reset the cursor because it can get stuck with the resize cursor if you hover above the gutter and scroll out of the column cell zone. Depending on your header’s design, you might need to implement more advanced behavior here.
Combining all these customizations and fixes, we get something that looks and acts the way we wanted it to:
Row
Since NSTableView is constructed from multiple cells, to customize the look of the row, we have to use NSTableRowView. Apple has a convenient breakdown on their old school documentation page:
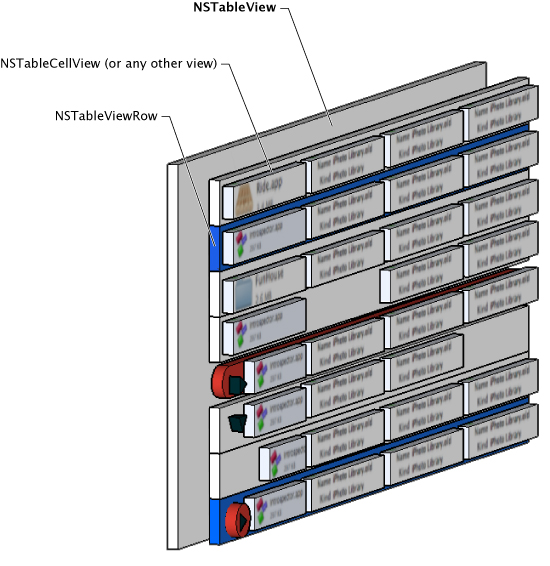
NSTableView breakdown from Apple documentationIn my case, I wanted to change the background and selection colors, which is quite straightforward with a subclass of NSTableRowView:
final class InvoiceListTableRowView: NSTableRowView {
    override func drawSelection(in dirtyRect: NSRect) {
        if selectionHighlightStyle != .none {
            drawBackground(
                color: NSColor.black.withAlphaComponent(0.015),
                in: dirtyRect
            )
        }
    }

    override func drawBackground(in dirtyRect: NSRect) {
        drawBackground(
            color: NSColor.white,
            in: dirtyRect
        )

        if !isSelected {
            drawSeparator(in: dirtyRect)
        }
    }

    private func drawBackground(
        color: NSColor,
        in dirtyRect: NSRect
    ) {
        color.setFill()
        dirtyRect.fill()
    }
}
The only gotcha here is the separator. You can draw it using drawSeparator(in:). This way, it will respect all the customization you do on the NSTableView itself. You might also want to add some logic to hide it for the last row, etc.
Once again, if you don’t want to end up with thousands of views in your memory graph, don’t forget to set identifiers when creating reusable NSTableRowView:
var rowView = tableView.makeView(
    withIdentifier: .rowView,
    owner: self
) as? InvoiceListTableRowView

if rowView == nil {
    rowView = InvoiceListTableRowView()
    rowView?.identifier = .rowView
}
Grid
At this point, I had most things looking and acting as I wanted. But, the grid lines showing up in an empty table during searches weren’t pleasant to look at.
I was a bit surprised that instead of some flag to remove grid lines from empty rows, you need to override drawGrid(inClipRect:) with an empty implementation. Nevertheless, I was very happy that it was so easy to achieve what I wanted.
Menu
No surprise that at some point I started implementing a context menu, as in fact, that was one of the main reasons for the rewrite. Apart from the very very very and very verbose syntax to create NSMenu, achieving this was very simple:
override func menu(for event: NSEvent) -> NSMenu? {
    let point = convert(event.locationInWindow, from: nil)
    let row = row(at: point)

    guard
        row >= 0,
        let invoice = invoiceListDataSource?.getInvoice(at: row)
    else {
        return nil
    }

    selectRowIndexes(IndexSet(integer: row), byExtendingSelection: false)

    return invoiceListMenuBuilder.makeMenu(
        invoice: invoice,
        getSelectedRow: { [weak self] in self?.selectedRow },
        invoiceLocaleManager: invoiceLocaleManager,
        invoiceListDelegate: invoiceListDelegate,
        invoiceListDataSource: invoiceListDataSource
    )
}
Aside from being sad that now I have to maintain two different implementations of the context menus in the app and being tired of writing hundreds of lines of code to create my NSMenu with its submenu, I was very happy.
Click
Implementing double-click was also a simple task with only a few nuances:
tableView.target = context.coordinator
tableView.doubleAction = #selector(context.coordinator.tableViewDoubleClicked(_:))
The first one is that you shouldn’t forget to set tableView.target. The second one is that if you have a tall header like myself, you might want to check NSTableView.clickedRow when performing the action, as otherwise, you can end up in a situation where you trigger an action that wasn’t associated with the row.
Keyboard
This was by far my favorite part, as it allowed me to remove my extremely overcomplicated logic that would handle key navigation and actions like delete and return in my LazyVGrid. Actually, to say that it was overcomplicated would be an understatement, as it was doing so much that I could probably release a mini-app just for it alone.
In AppKit world, it was as simple as overriding a single method on NSTableView:
override func keyDown(with event: NSEvent) {
    guard
        selectedRow >= 0,
        let invoice = invoiceListDataSource?.getInvoice(at: selectedRow)
    else {
        return super.keyDown(with: event)
    }

    switch KeyMonitor.Key(rawValue: event.keyCode) {
    case .return:
        invoiceListDelegate?.open(invoice: invoice)
    case .delete:
        invoiceListDelegate?.promptDelete(invoice: invoice)
    default:
        super.keyDown(with: event)
    }
}
Conclusion
There’s a lot more code I haven’t shared. In fact, the rewrite led to 1325 insertions and 745 deletions, but that’s not the main point. What I really wanted to document were some edge cases and issues that I couldn’t find info on the wide web.
After this rewrite, I’ve got a lot on my mind. I don’t want the takeaway to be that SwiftUI is slow and AppKit is fast, or that SwiftUI on macOS isn’t ready for serious apps. In reality, the very complex template editor for this app is almost entirely written in SwiftUI, which handles it impressively well.
It’s amazing how quickly you can develop with SwiftUI, and how verbose it feels to switch back to AppKit (hello, NSMenu). There are definitely tasks I could’ve completed much faster with SwiftUI, but I’m sure I would’ve encountered certain paper cuts that would require either changing direction or going a level down.
I actually have a strong love for both technologies. This rewrite made me realize how much I love AppKit for allowing you to go so deep into the stack and even when you hit the bottom you still find something below that can be shaped the way you want.
Also, developing using AppKit feels like a very engaging experience as you have to think about every single detail. It’s both a curse and a blessing. In SwiftUI, I don’t have to think about certain things but sometimes I DO WANT to think about those things, not only I want to think about them but I want to tell SwiftUI what specifically I want and how me and SwiftUI can work as a team to optimize it.
From the day I started writing this app, I already saw so many SwiftUI improvements that completely removed certain paper cuts (hi focusability). While supporting older OS versions sometimes makes it a bit bitter, I’m still very excited for the upcoming WWDC to see how a bunch of other problems will be things of the past (and older OS versions).
I probably don’t do this often enough so I want to thank all the engineers who make this possible. And by all, I mean all and not only the ones that work on some shiny part of the system. Be it the person who implemented NSTableView.doubleAction or the person who worked on NSView.menu(for:), know that your work is appreciated.